In this section we will shortly describe the methods and techniques used in preparing and actaually producing the video.
One of two maintools for this production was - as already mentioned - the
SGI Explorer program running on a Silicon Graphics Indigo workstation
with a 100 MHz RISC 4000 CPU, RISC 4010 FPU, 1Mb cache, 96 Mb RAM and an
Extreme graphics board.
workstation
with a 100 MHz RISC 4000 CPU, RISC 4010 FPU, 1Mb cache, 96 Mb RAM and an
Extreme graphics board.
The program is a very intuitive piece of software where the data flows in pipes you connect to different visualization or calculation modules and ends up in a render module showing the data. In this render module it is possible (though dependent on the size and type of the data set) to manipulate the data (zoom, turn, fly through etc.) in real-time.
The modules and pipes mentioned above are organized in so-called maps showing graphically what is connected to what and which modules are active at a given time.
In most cases (especially the simple ones!) it is rather straightforward to build these maps since one basically only needs
Most of the video was produced making live animations in the render module while the videotape was running. Very simple maps were applied to do this including only the IDL2Lat module to read in the data, the Ball module to shape up the datapoints as points, a GenerateColormap module to set the color of the data points, to or three Line2Geo modules to create a system of reference (see section 4.1) and other bounding line effects and of course the render module to make it all visible.
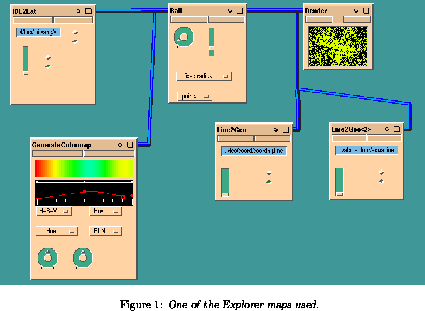
These sequenses needed some rehearsing of mouse-movement for the operator but in a larger perspective this was still less time-consuming than making "real" animations with IDL (see section 3.2). A snapshot of the map is shown in figure 1.
A more sophisticated technique was applied to produce the sixth section
of the video - an animation of  slices revolving around the axis
pointing towards the north celestial pole (see section 4.6 for further details).
slices revolving around the axis
pointing towards the north celestial pole (see section 4.6 for further details).
The basic idea is to make a camera animation by setting out camera points in the render module by means of the AnimateCamera module which then is able to calculate and render a specified number of interpolated camerapoints between the points set by the user. In this manner an animation is produced.
By connecting the render output to the WriteImage module it is possible to write the render image to a disk in TIFF format. By synchronizing the input of a new image in the render module and the readout of the WriteImage module it is possible to write out the render image every time it has been redrawn. The module AnimFile gives the output images an appropriate path + name (number) and extension (.tiff).
The frames produced in this manner can now be read by IDL and stored into a socalled "pixmap". A pixmap is an invisible window or rather an invisible part of memory where the frames are lying side by side. Since the frames are stored this way they can be displayed very fast and smooth (approx. 20 frames pr. second!) and thus a very nice animation can be created. The obvious limit for this process is the available amount of free memory and since 200-300 frames are needed for doing only 10 sec. of animation this really sets a very low upper limit for the length of such animations.
We used the IDL procedures loadanim.pro for reading our frames into the pixmap and runanim.pro for running the animation. These procedures are listed in appendix H.
The actual videorecording was made with a SuperVHS Hitachi S890 NICAM Digital HiFi Stereo VCR and the output from the workstation was controlled by means of the VCP tool. This tool provides control of several parameters of the videooutput - horisontal and vertical offsets, antidithering and subcarrier frequency just to mention a few.
In practice a frame of fixed size is placed over the section of the screen one wants to record, the offsets and other relevant parameters are set and then the recording is controlled at the VCR "as usual".
The on screen text separating the sections of the video was produced by means of IDL.
The sound and narration of the video were dubbed on the final video by means of an audio mixer plugged into the VCR audio input. A microphone for the narrator and a Compact Disc player were connected to the mixer and the audio dubbing was performed in real-time, without editing, while the video was running.